Dispatch User Guide
Admin Settings
To benefit from the dispatch functionality, the dispatch setting must be enabled in the admin settings.

User Roles
Team Owner
Any user that requires the ability to assign an action to anyone other than themselves will need to have the “Can assign items to others” permission enabled in their user profile.
Owners
Owners can access the mobile Chexology app and the Dashboard, accessible through a web browser. The Dashboard controls users, items, pricing, and reporting.
User Permission
Any user role can be assigned the following user permission.
Can assign items to others:
Any user that requires the ability to assign an action to anyone other than themselves will need to have the “Can assign items to others” permission enabled in their user profile.
Go to staff
Select user
Check the box for “Can assign items to others.”

Actions - What are they?
Chexology allows you to create actions that are added to the Action List. An action is a task that needs to be executed, such as delivering or returning a checked item. More options are coming soon.
Each action has items associated with it, a destination, and an assignee. You can see what state an action is in and how long it has been since the action was requested. This allows you to have insights into what actions need to take priority and how long a customer has been waiting for their items.
Creating an Action
*If a user does not have assignment permissions, tapping the start button will create an action and add it to the Action List assigned to them.
An orange bar on the right side of the exchange card indicates there is already an action associated with that exchange. If you see this, tap the card to show more details about the actions that have already been created to avoid duplicates.


Specify the destination and any notes.

Tap queue to Queue an action

Choose an assignee

Select the items to be included in the action.

Pro Tip: You can also create an action from the Customer Details section.
Edit an Action
Update field or assignee

Tap on the action in the Action List or tap “view action from the customer profile page.”

Tap “Edit Action.”
This will take you to the action screen and allow you to make updates to Notes, Destinations, and Assignees.

Pro Tip: If you just want to update the Assignee, you can tap “Reassign.”
Splitting an Action:
Sometimes, items need to be returned by different team members or taken to different places, to do this actions can be split to make it clear who should take what and where!

Tap on the Action.

Select the items to move to a new action and tap split.
Action Flows

Flags on the action cards indicate the type of action.

After tapping the Start button the button will become the next action (Return or Store).

The Assignee taps the button to complete the action.
Once an Action is assigned, the assignee will have a “Start” button.
Pressing “Start” indicates that the action is in progress.
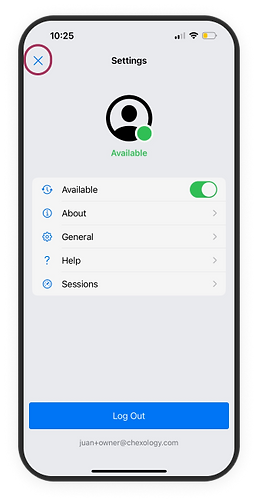
Change Team Member Availability
As a Team Member, it is important to set your availability correctly in order to receive assignments.
Go to staff
Select user
Pro Tip: When you log out, you will receive a friendly reminder to set your status as Away.


Still need help?
Send us an email at help@chexology.com if you need support.