Chexology support
Getting started guide
Why Chexology
Chexology is a tool designed to make your job easier. You’ll experience smoother lines, reduced customer complaints, and a digital record that lets you efficiently find items at a glance.
If you have questions regarding our software at any point, please contact us! We will happily walk you through the process or jump on a call to answer any of your questions. We appreciate you, and we want your onboarding experience to be a smooth one.
Coatroom training video: 3 min.
Square reader training video: 3 min.
Required hardware


iPad
(iPad or iPad mini and cables)
Item tags and bands
Tag reader
Tag reader dock may be included (optional)
Hardware accessories


iPad enclosure
PivotTable adhesive foam discs
(Single-sided and double-sided)
L-wrench
Prep accessories
Why?
We designed hanger tags to help you see all your claim numbers from a distance.


Insert the arrow band into the tag opening, arrow side out. Pull the circle end of the band halfway through the hole.
Hold the tag against the neck of the hanger and pull the arrow through the band circle.
Make sure the coat tag is facing towards you with the tag number right side up as shown in the image.
Pro-Tip: Stretch out the arrow bands to loosen them!
.png)


Positioning the kiosk
Position the kiosk as indicated in the illustration. With this ideal location, you’ll experience better customer photos, more accessible access to the tag reader, and superior visibility of the device while assisting customers.
Pro-tip: For permanent placement of your kiosk, use the double-sided PivotTable. For temporary placement, use the single-sided PivotTable which will work as a suction cup.

Installing The Chexology App
Go to the app store.
Search for Chexology
Tap "Get" to start your download

Terms
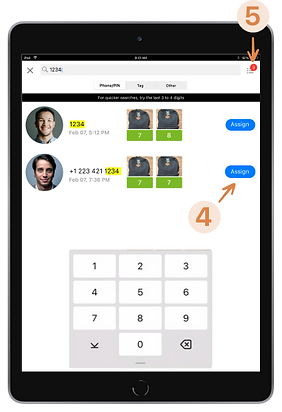
Settings - Gear icon at the top left to access application settings.
Search - Search field that allows for searching of customer profiles based on phone number, pin number, tag number, name, or other optional fields.
Item shelf - Summary of items scanned and customer details.
Assign button - Tappable button for staff to use when assigning items for retrieval.
Action list - A log that allows you to view all the items waiting for an action to be taken. From this screen, you can assign/un-assign yourself tasks.


Prep tag reader
Open the app and log in with your account credentials. Follow the prompts to enable camera permissions for capturing customer and item photos if it’s the first time you’ve opened the app.
How to connect your tag reader to your iPad via bluetooth
1. Power on the tag reader. An indicator light will appear.
2. Tap the gear icon to open the app settings.
3. Tap on the Accessories menu.
4. Toggle on "Use Bluetooth Reader.”
5. Tap on the serial number that matches the last four digits on the tag reader’s label.
If the reader is not connected properly an orange bar will appear at top of the screen. Power it off and retry the above steps.
Pro-Tip: If you have multiple kiosks and tag readers, power each reader on one at a time. This will allow you to easily connect each reader to a kiosk.


Still need help?
Send us an email at help@chexology.com if you need support.